This is the final week and I unfortunately was not able to finish of the piece but I definitely plan to go back to it and get it done as a portfolio piece. Anyhow, it was time to create the rock texture.
Rock Wall
To create the rock wall texture I used the same method as I did back in BA3 with the cathedral. First create a tileable block layout in 3dsMax to later import to Zbrush and sculpt.
Finished rock wall rendered in Marmoset Toolbag 2 with Tesselation.
Final thoughts
Unfortunately I did not have time enough to finish this piece but that was to be expected of such as massive project including so many bits I wasn't sure on. However, I did end up learning a lot including a new software and I am definitely more sure on the workflow of making buildings. When i go back to it to make it into a portfolio piece I will re-make the rock texture because I wasn't too happy with the result and of course finish off all the unfinished bits on it. Also I believe it will end up looking A TON better once in engine with decals and polypainted!
With the blockout done it was now time to replace the blocks with actual models. I started off by creating the logs. To make the logs I followed a workflow that they used to create the amazing models in The Order which is by using micro detailing in Zbrush, this can be seen here: https://www.artstation.com/artwork/Vy5J5
High Poly log sculpt in Zbrush
Low Poly logs, baked and textured.
With the logs done I started to replace all the shapes, this is now how the building looked like.
Substance Designer
It was now time to create the roof of the building. A few days ago I was shown the amazing software called "Substance Designer" which is a software for creating tileable textures. I thought this would fit perfectly with my roof so I decided to learn how to use it. After all this is a Development Project so now was the time to learn new software!
To learn the software I looked up different tutorials and I found a great tutorial series on Youtube going through step by step the process of creating tileable textures.
My Result rendered in Marmoset Toolbag 2
Since his tutorial was great I also decided to follow the second part which showed you step by step how to create kitchen floor, although on this one I decided to modify it afterwards and create my own design to it and explore the options. Here is a render in Marmoset Toolbag 2 with two different light setups to see the PBR.
Creating the Roof
To create a tileable roof I also ended up following a tutorial to start with, this was because with only one days of experience with the software I wasn't too comfortable with it yet to start making everything from scratch. I found this tutorial on Art Station which suited my needs perfectly:
Here is a render of my result from following the tutorial and then experiment with my own settings.
Now it was time to create the roof for my building. I used knowledge iv'e learnt from the first tutorials and the roof tutorial to create something that fit my building.
Today we got our next project in this Unit which will focus on Specialism. For this project we got 3 weeks to produce a piece that fits with what we want to specialize in the industry. Since I want to become an Environment Artist I will be focusing on Environment Art. We will also have to look at different job specs and portfolios to get an idea of what is required from us by the time we graduate.
3D Environment Artist
As a 3D Environment Artist your job is to furnishing the different game worlds with props and objects. Your task can vary from creating a small tin can to creating a massive building. You will use different workflows depending on what you will be working on which makes it a very varied role. You will also work very closely to the art team to make sure you can maintain the same artstyle as the game provides.
Examples of job specs
Arkane Studios
Blizzard
Gearbox
Planning
I started off by looking into what kind of environment piece I wanted to create. Since I have very little experience with creating buildings I'd figure now was a good time. It is only for 3 weeks so creating a entire scene might be a bit a bit tough but at least it will give me time to start working on it and introduce me to the workflow.
The piece of concept that I will be working from is the following:
Concept made by Lionhead Studios for Fable Legends
I decided to go with this concept piece because first of all it is a very nice concept piece, it shows me all angels and information I need to create this structure. Secondly I have always loved the wonky artstyle of Fable and most of my work is very realistic so this would be a nice change.
Blockout
From doing some research about modelling buildings I've learnt that Blockout's are the best way to start a project. This is a quick rough model where you don't think about anything but the shapes of the building. There will be no textures or anything, just simply shapes to get the silhouette and forms right.
Here are a few pictures of different angles of the finished blockout.
This week we had a 4 day long Gamejam! We were divided into teams of 5 where my team who went by the name "The Sweetrolls" included Myself, Charlotte Lawrence, Jack Edwards, Natalja Rojek and Dennis Wong. The theme for the game was "Facade", And it also had to be some sort of Arcade game with a fixed camera.
The roles in the team were the following:
Programmer (With blueprints)/Level Designer/Engine Guy - Me
3D Artist / Level Designer - Jack Edwards
2D Artists - Charlotte Lawrence, Natalja Rojek and Dennis Wong
Brainstorming
We started off by brainstorming about our game, which actually was a very quick and painful process because we all agreed very quickly. Since we all really enjoy the Italian renaissance and when we thought of "Facade" we thought about a Masquerade. We started thinking about what kind of game we wanted to create and quickly came to the idea of creating a sort of Stealth/Assassin type of game.
With the setting and gameplay decided we all set off to work. I started working on the AI to get the guards to react as we wanted and the camera setup. The game is based on the Top Down template but very modified to fit our purpose.
Video showing early AI testing
Work in Progress
Work in Progress
Final look of the game
Final Result
We are very proud with what we achieved in just 4 days, we had a great team chemistry as a team and had very fun during the gamejam! The game turned out great and even tho some bugs it was still great fun to play it! Seeing other people play it was also hilarious, I believe it was only 2 people except us that made it that managed to win the game! Which of course in this case is a good thing because it was supposed to be an Arcade game after all!
So this week it was time to pitch our games. I think it went very well and both the tutors seemed very pleased with my presentation. I have to admit I was a bit nervous since English is not my main language after all but once I stood up there it went super well! The critique I got was that I have some cool features that I should mention more, such as the Warhorn that gives the player a boon for a short amount of time but attracts enemies from far away. But other than that it was all just positive stuff!
Overview Page of my Pitch Document
Main Menu
Since this is the last week of working with the Prototype it is time to wrap it up. The reason why I didn't do the main menu until such a late stage is because it is an annoyance to have when I quickly want to try out other features ingame. Let's say I adjust the values for my Hunger system then every time I want to try it out ingame I will have to go through my main menu.
The way I did the main menu was to create a second camera in the world and when the player presses the start button it switches back to the main character's controls. This way I could also add some nice Post processing effects such as Depth of Field etc to only the main menu without affecting the player camera. I found out that there is a node called "Blend camera" in Blueprint which did exactly what I wanted. To hide the change of cameras I created a black fade in and out effect which fits very well because the way the game starts is that Aneira have just woken up from a rest and the campfire is put out.
GIF of the Main Menu
Tutorial
I also had to create a Tutorial for the player this week, an introduction to the inventory and fuel system. The way I did this was by making so the campfire has run out when Aneira first wakes up. That way the character have to fuel the fire with some logs right next to it to keep Aneira warm and not freeze to death. There is floating text in the game explaining the basics but then the player is on his/her own.
I have continued to polish on my game, both when it comes to the level design and the gameplay itself. After attending the group critique sessions I got some really good feedback that the snow was a bit too quick, so I adjusted that and it does now indeed look a ton better. I have also done slight changes such as cleaning up my blueprints, modify the values of the player stats to enhance the gameplay, adding lots of more sounds to the game, and so on. One issue I noticed that I don't think I will be able to fix for the prototype is that the different values for the stats varies on the different computers. The reason for that is because I am using the "Tick" node to run the whole system and the "Tick" node works in the way where it every split second or so it uses the following nodes. The issue is that depending on your computer this "Tick" rate will be different depending on how high FPS you have. So if you play on a High-End gaming PC the stats will drain quicker than on a Medium spec laptop. Since this is an Prototype I will not invest time in fixing this because that would mean redoing most of the systems and I must focus on other things for now.
GIF Showing the new snow effect
Enemy AI
I have also started working with the enemy AI for the game, which in this case is the giant trolls. I found that the "Infinity Blade: Adversaries" pack had trolls in it which fit perfectly for my game. All i had to do to make them fit my snowy environment was to adjust the texture slightly so they were more blue instead of green as they are originally. To make the large all I had to do was to simply scale them up.
Texture
To get the AI working in the game I found a excellent tutorial series, I ended up going with the AI version of his second tutorial where he shows how to create patrol AI. I did try with random AI but the giants usually ended up going to the base which is a bit unfair for the player. So I choose to go the patrol route to get a bit more control over them.
I added walking sounds to them in a similar way as for the Player, I found dinosaur walking sounds on Freesounds.org and reworked them in Sony Vegas to suit my own purposes. I also added camera shake that shakes more the closer to the troll the player is. This feature I had to ask some people to try out to get the amount of shake right.
For the damage bit what I did was simply adding a collision box infront of the troll and if the player collides with the box the troll will play an attack animation and then the players health will be set to 0. So they will kill you in one hit. I did wish that the path finding would work a bit better than it currently does but for a prototype it's doable.
Game Pitch Document
For the Pitch document it is now mostly done, just have some further text to add. I ended up having to use Concept Art found on Internet but I will leave the source on the pages using concepts not made by me. My view on this Pitch Document is as if we are going to a AAA studio like Ubisoft to pitch the game, who knows maybe in a few years from now we are actually standing there presenting our game to a big studio so why not take this chance as practice and go all in?
Every time I tried out my prototype and though "What is the most immersion breaking with my game right now?" and then I see a robot hand grabbing objects in the game... a ROBOT hand. How are you supposed to get immersed and feel as you are playing as a huntress in a celtic/tribal setting if your player have robot hands? This would not do so I decided to look into how to change the player hands. Since I already back in week 2 learned how to create my own animations using a already provided rig I thought there must be a way to change the model but keep the rig.
I found this tutorial that showed how to replace the player hands, however before starting to 3D model my own pair of hands I decided to try it out with the ones the creator of the tutorial provided to see if it works first.
After getting the custom hands to work ingame it was time to start working on my own pair of hands. This was a very fun process since I did not know a lot about the anatomy in the arms so this made me learn a ton of new stuff! To help me with the anatomy I followed a tutorial again by Digital Tutors where they talk about the different muscle groups and so on.
To save time I also decided to use a very basic base mesh that I found online and start from there. The basic mesh used can be seen on the upper left on the image below.
The topology on the final arm is not the best and could do with some improvements but because this is for a prototype and I had already spent too much time on the arms I decided to leave it for now. The texture was mostly made using spotlight in Zbrush by using real life images of female arms. I did get some critique that the fingers were too narrow so I ended up making them a bit thicker for the final version in game.
For the animation bit it worked very similar to the way I animated the robot arms, all I had to do was to skin the RIG that were provided by Unreal Engine to fit my own arms. I did this in maya using the interactive bind skin tool. From there it was just to re-animate the animations I needed. In this case it was a grab animation, idle and run. I thought it would also be cool if the character raised her hands to warm them when she got close to the fire so created a animation for that aswell.
GIF Showing grab animation in Maya.
Here is a short video I made to see the hands working ingame.
Fuel system for fireplace
After much trial and error I finally got the fuel system to work for the fireplace. The reason why I could not get it to work in the beginning was because I did not fully understand how to communicate between different blueprints. After a ton of researching I finally had a massive breakthrough how it actually works. I used to think that when you in the blueprint made a reference the player character it would just work, that is not the case. How it actually works and I will try to explain is as well as I can. When you create a reference to the player character it is actually just an empty container until you tell the engine what to fill it with. Which in this case is the player character. Even though it's named "Player Character" it still does not understand what we want it to communicate with. So to do this you have to make the variable public, and click on the blueprint in the world and now in the details to the right there will be a dropdown box named after the variable. Here you can now in the dropdown box select the player character that is placed in the world and it will work!
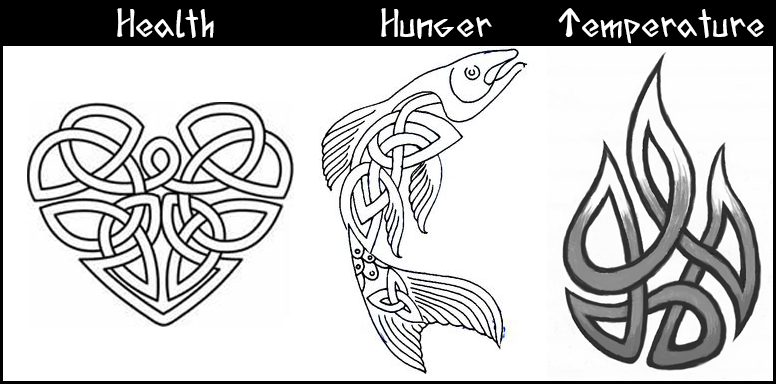
Since I now had my new setting it was time to rework the UI to fit the theme. Since it has a celtic/tribal setting I figured I could use celtic symbols to represent the different stats and leather as the menu background. The UI went through a few iterations due to feedback.
UI Mockup
First UI iteration ingame
As you can see I used leather as a backdrop for the Inventory and the stats, I got some realy good feedback that the temperature meter looked more like a waterdrop than cold so I ended up changing that one. I also did not like how the hearth came out, it's a bit too messy, so I changed to a less cluttered version of a Celtic hearth.
Final UI
I also changed the cursor for the game to again increase the player immersion. To explain the UI a bit more I will include one of my pages from the pitch document.
Fireplace Fuel System
This week I also started working on a fuel system for my Fireplace. The system will basically require the player to gather wood to fuel the campfire and keep it alive. This was inspired by ARK: Survival Evolved where they do have a very similar system. However, I did stumble upon some issues which did not get resolved this week. For some reason my Blueprints have an issue communicating with eachother. I did create a forum post on the Epic Forums to hopefully get this problem solved.
As you may have seen above, the pitch document is progressing nicely. I did have an issue with coming up with a good looking design for it. I tried to make the presentation fit to the Celtic/Tribal theme so first I tried to have a cave background but it was way to noisy. I thought for myself which games are fantasy setting but still have a very nice slick UI. Then Skyrim came to mind, so as you may have noticed it is very inspired by Skyrim's UI design.
This week we had to make a smaller pitch of our game prototype, this was not the 10 pages long game pitch but a smaller one just to see our progress so far and get feedback. This was very valuable for me because I ended up changing my setting completely after the pitch was done due to feedback. I will write more about that later in the blogpost.
So due to the game pitch I had to start thinking more about my core game loop. What do I want out of my prototype. Since it's just a prototype of course it cannot have the most complicated one but still it's good to have one to keep you on track. A idea I got that I realy liked was the idea of having a "Safe Zone". I got the idea from playing Ark, where first when I played without having a place to call my "Base" I felt sort of lost, but after finally building my first base the game got a whole other feeling. I now had a place to call home, to always come back to when I have been out exploring. That's why I thought this would be great for my prototype. It would both act as a safezone and a place where the player always could go back to after his/her adventures.
My prototypes core game loop
The Safe Zone built by assets provided from the free "Infinity Blade" pack.
I also now had to come up with a title for the game, I wanted it to have to do something with snow but not to cliché. I started looking up different words for snow/snowstorm and found out that "Whiteout" was a thing. So I decided to call my game "The Whiteout".
Feedback
When the presentation was done people did like my idea (Even though a bit over ambitious) but I did get one great piece of feedback which really stuck with me and it was that the narrative was a bit missing. I had been so focused on the gameplay mechanics so I hadn't really given the narrative a proper thought. So that was about to change.
Aneira: The Hunt
Since the game was greatly lacking in narrative I sat down and started to properly think about what I wanted my world to be. The result was a complete rework of the story and setting. The new setting is now a world inspired by celtic/tribal themes and the game is now called "Aneira: The Hunt".
You are now playing as a young woman named Aneira, (Snow) a name given because of her exceptional survival capabilities in the wild. Living among other hunters in a tribe who are the believers and followers of the goddess Meev “Wolf Queen”. To pay respect to their Goddess they every year have an event called “The Hunt”, this is the time when 5 sons and 5 daughters are sent off to the north to find and slay a Giant, or better known as Fomorian. A Fomorian is a very dangerous type of Giant who feeds on the flesh of animals and Humans. Many people never come back from The Hunt, either because of the dangerous cold up north or because they have lost a battle with a Fomorian.
The game takes place a week into the Hunt and you are the last one alive. Your main priority is now to stay alive and fight both the cold and the giants roaming the lands.
Here is a short video I created just to set the mood of the new setting:
Game Mechanic Progress
Due to the new setting I had to remove some of the old assets such as waterbottle and tincans and replace them with more fitting objects such as bushes which the player can gather for food etc. I also did further polish on the movement and the immersion of the game by adding smooth crouch, running and footstep sounds. The later one was an interesting process because I started off by following a tutorial which did it in a very complex way but to later replace it with a way easier blueprint. The first tutorial was created for having different surface types and such but since the world is mostly covered in snow this was not needed for my prototype.
Here is an image of the complicated footstep mechanic, where it take in consideration what kind of material the player is walking on.
Complicated Footstep method
This was the easy way that I ended up with that just basically just uses a sound cue with 10 different walk sounds that I got from "Freesounds.org" and edited using Sony Vegas. The sound cue then picks randomly from these 10 and every time they play with a different pitch to make them sound different every time the player walks. Since the player cannot see his/her feet it doesn't matter when the sound plays, the only thing I had to change to match were the headbobbing but that was easy by just tweaking some numbers.
Final Footstep method
As for the running mechanic I wanted something more than just a simple speed boost when holding shift. I really like how the running feels in games like COD and Farcry where when you bump into stuff the player stops to run and so on. So I found this really good tutorial where they showed how to implement a bit more advanced sprint mechanic into UE4 using Blueprints. This person had several excellent tutorials which I used to create my game prototype.
Overview picture of my movement blueprints
Parts of the run mechanics and headbobbing
Smooth crouch using timeline
Game Testing
For my gameplay to be as smooth as possible I arranged a small playtest with friends to get some hands on feedback of my movement. I got some very good feedback about that the headbobbing was too much and made some feel slightly ill so after some tweaking I managed to get it so everyone was happy. It was also very valuabe to see someone else play it to see how much they understand by themselves and how much I will have to explain using ingame tutorials.